Inspection is an inaccessible part of daily business, but what is the professional inspection process and method? TTS has collected relevant collections of FWW professional inspection for you, so that your inspection of goods can be more efficient!
What is Goods Inspection (QC)
Personnel engaged in inspection work are collectively referred to as QC (abbreviation for Quality Controller).
The inspection activities undertaken by QC are called inspection and are divided according to the QC entrusting party: there are 3 types, the first party inspection, the second party inspection and the third party inspection: the first party is the QC arranged by the manufacturer; the third party The second party is the QC dispatched by the client company;
Inspection by a third party entrusted by an external inspection agency for a second-party customer. FWW provides third-party inspection services
The inspection service provided by FWW is divided into: final inspection FQC and mid-production inspection On-line QC according to the product completion stage. The remaining stages are in-production inspections, which are early control activities for product quality.
Sample Size and Allowable Level (AQL)
The safest way to inspect goods is to inspect 100% of all products, but this requires a lot of QC time, especially for large batches.
So how can we find a reasonable sampling level to balance the quality risk of the product and the cost of QC. This balance point is “Sample size”. With the regulation of the number of samples, the next problem that QC needs to face is to find defects in the process of sampling inspection, how many defects, how many defects are acceptable for this batch, how many defects, does this shipment need to be rejected? This is the acceptable level (AQL: Acceptable Quality Level) Defect level (Critical, Major, Minor)
Defects found during the inspection process will be classified into 3 grades according to their severity:
Examples of grade definitions Critical (Cr.) fatal defects may cause potential harm to the human body or violate laws and regulations, such as sharp edges, acute angles, electrical leakage, etc. (usually, barcode problems will be defined as Cr.); Certified products, there are no major (Ma.) major defects such as CE Mark, some important functions or appearance defects on products such as thermal insulation cups, poor logo printing, etc. Minor (Mi.) minor defects such as minor appearance defects on products such as products Slight scratches on the surface, slight bad printing, etc.
Under normal circumstances, an experienced QC can determine the classification of defects found during inspection by themselves according to the above principles. However, in order to ensure that all the QCs involved have no ambiguity in the defect classification, some customers will compile a Defective Classification List (DCL Defective Classification List), list all the defects related to the product in the defect classification list, and indicate the defect level that each defect should be judged. .
Use of the sampling plan table
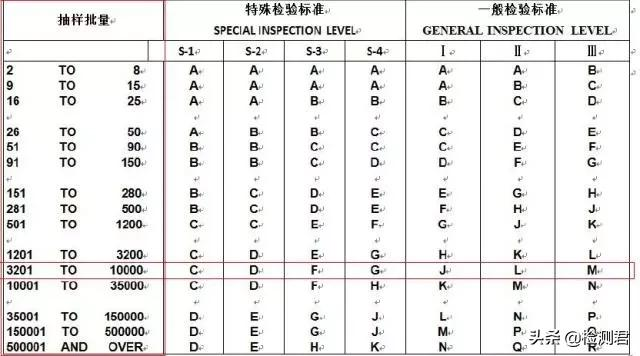
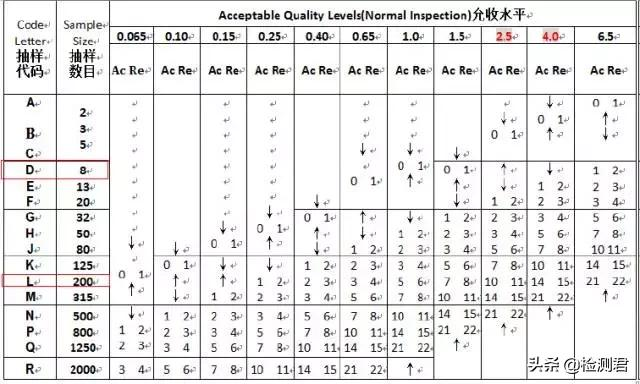
After introducing the concepts of Sample size, AQL and defect level, the actual application requires QC to check the sampling plan. A total of 2 forms are used together, the first one solves the problem of how much to draw, and the second one solves the problem of how many defects can be rejected.
Step 1: Check the first form, find the interval column of the total quantity of the batch of products in the “Sampling lot” column, and then horizontally check the cross column of “Special Inspection Standard” and “General Inspection Standard” to determine Quantity of sampling; 2. “General inspection standard” is used for sampling of visual inspection. There are many overall inspections, which are divided into three levels, Level-I, II, and III. The larger the number, the larger the sampling number; 3. “Inspection standard” is used for sampling of function and size inspection. The overall inspection quantity is small, divided into 4 grades, S-1, S-2, S-3, S-4. The larger the number, the larger the sampling number.
The default number of samples for FWW is Level-II, S-2. If the total number of products in this inspection is 5000pc (range 3201-10000), according to the default sampling standard of FWW, the sampling code for general (appearance) inspection is L; the sampling code for special (function) inspection is D
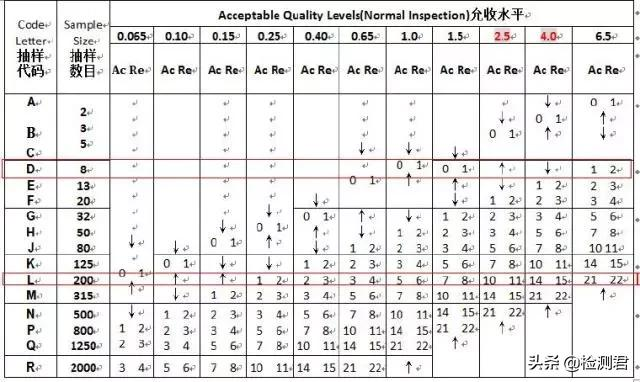
The second step is to check the second table, where L corresponds to the sampling number of 200pc; D corresponds to the sampling number of 8pc.
The third step 1. In the second table, there are two columns of Ac Re under the value of each tolerance level. When the total number of such defects ≤Ac value, the goods can be accepted; when the total number of such defects ≥Re value, the goods are rejected. Due to the similar logical relationship, all Re is 1 more than Ac. 0 is used as a special acceptance level, which is not reflected in this table. It means that the defect cannot exist. Once there is 1 such defect, the goods will be rejected; 2. The default AQL of FWW is Cr. 0; Ma. 2.5; Mi. 4.0, if according to this acceptance level: L (200pc) corresponds to Ma. Ac Re of 10 11, that is, when the total number of major defects is less than or equal to 10, the goods Can be accepted; when the total number of defects is ≥ 11, the goods are rejected. Similarly, the Ac Re of Mi. is 14 15.D (8pc) corresponding to Ma. is a “↑”, which represents the acceptance level with reference to the above, that is, 0 1; the corresponding Mi. is “↓”, which represents the reference to the allowable level below. Acceptance level, that is, 1 2Cr. 0, it means that fatal defects are not allowed to be found
Check List
Check list (Check List) is often used in QC’s inspection activities. All the points that need to be checked for products are recorded in the list to avoid omissions in the inspection process of QC. For long-term cooperation customers, FWW will prepare a check list in advance. The Check list is usually used in conjunction with the Defective Classification List (DCL Defective Classification List).
The basic process of QC inspection
Inspection process
STEP 1FWW will confirm the specific requirements of the inspection with the customer when applying for inspection, and specify the Sample size and AQL. and pass the data to the relevant QC
STEP 2QC will contact the factory at least 1 day before the inspection day to confirm whether the goods are completed as required
STEP 3 On the day of inspection, QC will first read the FWW Integrity Statement to the factory
STEP 4 Next, QC first confirms the overall completion of the goods (whether the product is 100% complete; the packaging is 80% complete)
STEP 5 Draw boxes according to the number of the total number of boxes
STEP 6 Check outer box information, middle box information, product information
STEP 7 Sampling check product appearance according to Level-II level, product function and size according to S-2 level sampling check
STEP 8 Summarize and calculate whether the total number of defects exceeds the standard, and confirm with the factory
STEP 9 After the inspection, prepare the FWW inspection report and send the report to the auditors
STEP 10 After the report personnel review the report, send the customer email
Post time: Jul-07-2022


